Showing posts with label wake essentials. Show all posts

Friday, April 6, 2018

Pylon Vs. Tower

You may have noticed a Pylon was the original way to get your rope higher, later came towers. Which one is better? Which one is more beneficial? This is definitely a tough question to answer as both options have their pros and cons. 

Pylons came out first. Some are made into the boat and others are aftermarket or extended and have cables that run from the pylon around the bow of the boat to hold it in place when under a load. These lines can get in the way especially if you have a crowd with you or an open bow boat. When you store an aftermarket pylon you have to remove if from the base and remove the cables. This generally leaves the base in the floor and personally prefer the floor to be clear. However, this allows it not to be permanent.  

If you have a pylon you may notice an uncomfortable amount of flex when pulling a larger person especially when they edge out. Some people say this is because all of the force of that weight is applied to one place and the flex can be reduced with a tower because you have the weight dispersed over 4 mount locations. 


Towers are a little more expensive than pylons. A tower allows you keep your seating room and there are no cables to run to the bow. You can mount board racks, speakers and lights on it. Plus with most towers you can run your wiring through the tubing. Now some towers are not very tall so if you are above average height you may hit your head especially if you have hanging accessories. On the bright side there are some manufacturers like Big Air and Vulcan that make their towers about 5 feet tall. This means with an average gunnel (2ft) your at about 7 feet, so most people don't have to worry about hitting their head.


To be honest a lot of this argument has to do with personal preference. Some people say "if it ain't broke don't fix it" and prefer the slightly less expensive and less permanent pylon. While others prefer the more permanent and clean approach of a tower. Below is a list of forums that have discussed this topic. Keep in mind the forums are a little dated so the prices are a little off. 


Friday, March 31, 2017

Big Air Torrent Tower

Big Air is one of our most popular manufacturers that we carry. They have been in business for nearly 20 years! In our experiences with them they have been very easy to deal with. They are very serious about their customer service. They are a Christian based company and with these values in mind they try to keep their customers first and their prices affordable, which allows us to offer great pricing to you!


The Big Air Torrent Tower is a very unique tower that fits most boat 72"-103" . It has gussets in the corners to ensures a solid pull. This aluminium tower stands about 5ft tall, which should give you a significant about a head room. Do you store your boat in garage or boat lift but want a tower? No need to worry, the torrent is collapsible to near windshield height. The best part is the racks swivel! This feature makes getting boards and putting them away a breeze. 


Polished Aluminium Big Air Torrent Tower
The torrent is available in three finishes, listed below.


  • Polished Aluminium 
  • Polished Anodized (+$50)
  • Black Powder Coat 

Big Air also offers a option for a navigation light that integrates into the in to the tow knob. This is a really nice aspect especially compared to the ones that clamp on. Oh, and it is half the price of most competitors navigation lights.  


Big Air Torrent Tower Plate 


This stylish tower has built in racks Big Air allow to fit you board storage needs. This tower hold to racks, each rack can hold multiple boards. Below is a list of what you can hold on one side of the tower. Please note you can choose to hold to the same or different boards on each side. 
  • 2 wakeboards 
  • 1 wakeboard and 1 kneeboard 
  • 2 wakeboards and 1 kneeboard
  • 2 wakeboards and 1 surf 


Overall, The Big Air Torrent tower is a great, unique and durable tower. You will definitely enjoy the built in swivel racks. Plus not only will you have a "boss" tower you will have a great company backing that tower. Honestly, you can't go wrong with the Big Air Torrent Tower. 

Thursday, May 26, 2016

How To Reinforce Your Hull With Fiberglass

Is the hull of you boat less than 3/8" thick? If so you will need to reinforce the hull of your boat before installing your tower. This is a very important step.If your hull is not thick enough, the stress from a tower can cause damage to your fiberglass over time.  In the video below, Shane from Wake Essentials shows you how to reinforce your hull using fiberglass.


Wednesday, February 3, 2016

Skylon Pro XT: Product Review

Skylon Black Powder Coat Tower 
Skylon has been around for about 30 years. WOW! That is a long time. They strive to make a very high quality product. They also strive to keep their customer service top of the line as well. Skylon not only makes universal wakeboard towers and accessories they also make factory towers for a few boat manufacturer.

Today our topic of discussion is the Skylon Pro XT Tower. This tower a universal tower, that fits all boats 79"-105". This tower has 2 3/8" tubing. Did I mention it is very strong and has a rigid- guaranteed silent design? Need to collapse this tower on the water but don't have any tools? No worries, you don't need tools to collapse this tower. It has a heim joint and turn knob design at the mounts. It also comes with a navigation light inlcuded. The best part of this tower is it is made right here in the USA!!! The Pro XT is available in 2 finishes listed below. 


  • Black Powder Coat
  • Anodized Brushed Aluminium


Overall: The Skylon Pro XT Tower is a great choice It is a strong tower. If you need to collapse the tower often you do not need tools, you may find this is very nice to have. If you have any questions feel free to contact us or Skylon.


 Skylon Pro XT Tower January 20, 2009
Reviewer: Anonumous I'm happy with the purchase of my Skylon pro XT tower. Putting the tower up and down is pretty easy with help from my wife and 14 year old daughter. My boat is garaged so it's done every time I take it out. The factory bimini still fit with the new tower which probably saved about $800.00.

Tuesday, November 11, 2014

With so many bimini choices... Where do you start?

There are many different biminis our there for sale. With so many choices, you have to ask yourself some questions. We're here to guide you through these questions.


Roswell Shadow Top Bimini
Roswell Shadow Top

Does the manufacturer make one specific to your tower?

Some manufactures make a certain bimini for a specific tower, such as Roswell. For example, they make the Shadow Top specifically for the Aviator tower. Others make "universal" biminis such as Big Air. They state that their biminis generally fit most towers 2.5"-1.5" tubing, additional measurements may be required.


What looks best to you? What do you think will look best on your boat?

A lot of your bimini choice is about ascetics.
Look around to see if  your tower manufacturer makes a bimini specifically for your tower. If they do it may be something you love. If so, keep it in mind. If you are not that fond of it move on, don't waste your time.

The little things may be (or become) a big deal to you. Will things like removing a canvas or loosing head room drive you insane? All biminis have different features. Some mount over the tower, some mount under, some have a removable canvas. While others are stationary, some are collapsible. So lets look into these a little more.


Big Air Super Shadow Bimini

Do you want a bimini that mounts over the tower?

Choosing a bimini that mounts over the tower allows you to keep your head room. This can be very beneficial if you are tall. For instance, the Big Air Super Shadow Bimini. This bimini is a large 76"x76" square, that's over 6 feet on all sides. Imagine the shade that provides! With this simple but intricate design there is no need to worry about your tow rope interfering with the canvas while pulling a rider.


Big Air Bimini
Big Air Bimini

Would you prefer a bimini that mounts under the tower?

The Big Air Bimini, Big Air Collapsible Bimini, and the Roswell Sun Top mount under the tower. The Big Air Bimini is a semi-custom bimini made to the interior measurements of your tower (that you provide).


Do you mind removing the canvas when you are off the water?

The Super Shadow Bimini canvas is very simple to remove, you just undo some buckle clips (like those on most life jackets) and store the canvas away. The Big Air Bimini is also very easy to remove. You still undo the buckle clips but the canvas will furl onto the front bar and you have a boot to store the canvas in for travel.


Big Air Collapsible Bimini

Would you prefer to not worry about installing the canvas?

 If you don't want to worry about removing and installing the canvas for your bimini. the Big Air Collapsible Bimini may be for you. With this bimini you just fold it up and secure it to the tower!! How easy?
Barewest also offers one.
The Roswell Shadow Top even collapses WITH the tower!


What do the reviews say?

Last but definitely not least...Reviews can save you from buying a bad product or sell you on a good one. Reviews may even tell you the small things that people like or dislike.


After you consider all of these things you should have a pretty good idea of what you want. If you are still having issue deciding please contact us, we are always happy to help.


Wednesday, September 3, 2014

Should I install my own wakeboard tower?


We get this question a lot!  Seriously. Every. Single. Day.

Installing your own wakeboard tower is as easy as following instructions. If you are fairly handy this should not be a difficult process. This doesn’t mean we don’t want to handle your installation. If you want to bring us your boat we are more than happy to install your tower for you. While we take great care of our customer boats, who is going to take better care of your boat than you?

It is always good to have some help. This is something we always do, even in the shop when installing a tower on a customer’s boat.

To start the process, check to make sure you have access to the inside of the hull of your boat. Be sure to do this before you ever drill a hole. You will be extremely mad at yourself if you drill and you can’t get to the other side to install the nut and bolt. This is also a step where knowing the front to back stance of the tower will be helpful, this will tell you how far apart your mounts will need to be. All towers are different. For instance, a Big Air Vapor tower has a set front to back stance, while the Vulcan Boost has an adjustable front to back stance. Make sure you have clear access to all 4 mounting points.

Drilling in Your Wakeboard Tower
This is a customer install photo from their blog.
This is a Big Air Ice Tower Mount from a
 couple years ago. Big Air has recently
updated the mount style.
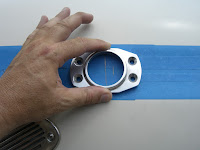
As our Roswell Wake Air representative stated “the hardest part for most people is drilling into their own boat”. This is mostly just nerves. You are about to drill into something you spent a lot of money on. Keep in mind, you are improving it.


Place some painters tape or masking tape down so you can mark where you need to drill without damaging or marking on your boat. Use the mount as a template if possible.


Measuring Wakeboard Tower InstallationBe sure to “measure twice, drill once”. This is something I have always been told and is a good rule to go by.

From there on out, as I said before, it is as easy as following the instructions. If you have a problem or question at any point of your installation, just give us or the manufacturer a call. We will help as best we can or point you to someone who can. Some manufacturers even have installation videos you can watch.


           Helpful Links


Wednesday, February 27, 2013

How to Install a Wakeboard Tower: Part II

Step 4: Install the back brackets

Now attach the backing plates, base pads and bases of the back brackets.

  • Put the backing plate and one of the base pads behind the front of the boat, with the base pad resting against the boat.
  • Put the other base pad against the front of the boat and place the base on top of the pad.
  • Lubricate the bolts before screwing everything into place.
  • Tighten these in place by hand.
  • Check to ensure that the base is firmly in place. Tighten further if needed.

Step 5: Get the wake tower in place on the back brackets

  • Attach the rear legs to the back brackets
  • Put the wakeboard tower in the up position and move the front legs in place at the front of the boat.
  • Double check the previously determined markers for the front legs. Remark if necessary.

Step 6: Drill holes for the front brackets

Repeat the steps for drilling the holes for the back brackets.


Step 7: Install the front brackets

Repeat the steps for installing the back brackets.


Step 8: Make final adjustments

  • Use a ratchet strap to pull in the tower corners before drilling the holes. This helps give the tower a pre-load, which provides it with more stability and rigidity.
  • Measure to make sure the tower is centered when in the up position by measuring from one corner at the top of the tower to the base mount on the opposite side.
  • Measure again from the other top corner down to the opposite base.
  • When both sides are within ¼” tighten all the screw sets so the tower is stiff.

Optional Last Step: Set up Your Wakeboard Speakers & Wakeboard Mirror

Of course no wake tower is complete without a set of wakeboard speakers that can kick out beats while you wakeboard and a wakeboard mirror so that you’ll know when to circle around and pick up your friend after a wipeout.

  • Speakers/mirrors should be installed after the tower is up and in place.
  • Mount the speakers to the top bar of the tower.
  • Drill holes for the speaker wires in the bottom of one of the legs.
  • Snake the wires through the back leg up to the speakers.
  • Put a protective cover over the wires.
  • Wakeboard mirrors simply wrap around the tower bar with adjustable fasteners that keep them in place.
  • The wakeboard mirror can be adjusted by hand after installation, giving you the perfect viewing angle.

Watch this wake tower installation YouTube video for a visual demo of the steps listed above, and feel free to let us know if you have any questions.

What is your favorite brand of wakeboard towers? Why?

Monday, February 25, 2013

How to Install a Wakeboard Tower: Part I

At WakeEssentials.com, our motto is ‘spend more time on the water, rather than on the web. With this essential wake tower installation guide you can get everything set up and ready so you’re good to go before the summer wakeboarding season kicks in high gear.

Tools you’ll need to Install a Wake Tower:

  • Reversible Drill
  • Set of Allen Wrenches (if not provided in tower kit)
  • Torque wrench
  • Lubricant or general purpose greaser
  • Tape Measurer
  • Dry Erase Marker
  • Protective Eyewear
  • At least one handy friend

Step 1: Read Manufacturer-Provided Installation Instructions

Your wake tower should come with an Owners Manual and installation instructions that are specific to your wake board tower – whether it’s a Big Air wake tower, Monster wakeboard tower, or other. Note the following when reading:

  • List of parts – make sure you have everything and the correct quantity of each part
  • Parts diagram - this will give you a visual of everything on the parts list and how they interconnect.
  • Company contact – look for a phone number to call in case you have any issues during installation.

Step 2: Pre-Assemble the Wake Tower

Pre-assembling the tower before putting it up will allow you to better plan where the brackets should be placed and how the tower will sit. This is particularly important if you have a tower that folds down.

  • Keep protective wrapping on tower legs and top section as much as possible.
  • Use lubricant to grease the bolt threads to prevent hardware from locking up.
  • Attach the rear legs to the top section using provided hardware.
  • Screw the leg ends into each leg and attach the rear bases/brackets.
  • If you have a folding tower now is the time to decide where to locate the back brackets so that the tower folds down into the position you prefer.
    • Use a cloth or tape to protect the surface of your boat.
    • Put the pre-assembled tower in the folded position.
    • Try various locations until you find where you want the folded tower to sit.
    • Make sure there are no wires or other obstructions in your preferred location.
    • Make sure there is at least 3/8” fiberglass to drill through. If not additional support will need to be added.
    • Mark the spots where the back brackets should sit.
    • Measure from the spots to the back corner of the boat to ensure that the spots are positioned the same on each side.
  • Now attach the front legs to the top section along with each leg base/bracket.
  • Determine the approximate location of the front brackets by again putting the tower in place on the boat, making sure the back brackets sit in their pre-determined spots. You will need the help of a friend or two to hold the tower in place while you examine the placement of the bases.
  • Mark the spot for the front bases.
  • Measure from the front bases to a reference spot on the front of the boat and from the front bases to the rear bases to ensure that the front bases are evenly placed.

Step 3: Drill Holes for the Back Brackets

  • Remove the front and back bases/brackets from the legs.
  • Measure from your base points to a reference point again before you begin drilling.
  • Mark where to drill the two holes through the deck.
  • Center punch each mark to make the drilling go more smoothly.
  • To first get through the hard gelcoat outer layer, run the drill in reverse with a 1/8” drill bit to make the hole all the way through the fiberglass.
  • Next use a larger sized drill bit to widen the hole to the correct size, again drilling in reverse.
  • Use the base/bracket backing plate to double check the position for the second hole, then drill the second hole using the same steps listed above.
  • Repeat the process for the bracket on the other side of the boat.

Stay tuned for Part II: How to Install a Wakeboard Tower!